Integration
![]()
Use the integration node to communicate with an external web service using a Restful API.
API integrations are presumed to be RESTful web services using JSON. The following web services require additional scope and effort to support.
-
SOAP-based web services using a namespace prefix, CDATA tags, and Web Services Security (WSS)
-
Encryption or hashing performed in the request body (other than TLS)
-
Data transformation
Name
Give the node a name.
URL
Enter the URL details of the API.
-
Select the HTTP Method: GET, POST, PUT, DELETE, or PATCH.
-
Enter the URL.
The URL can include variables.
Use the test URL to preview the web service response within the integration node.

Parameters
From the Configuration section, select the Parameters tab. Enter details to pass REST API information in the parameters.
Body
From the Configuration section, select the Body tab. Enter details to pass REST API information in the HTTP body.
|
Body |
Description |
||||||||||
|---|---|---|---|---|---|---|---|---|---|---|---|
|
None |
Pass nothing. |
||||||||||
|
x-www-form-urlencoded |
Enter key-value pairs. In the Key and Value fields, type text or type {{ to select a Studio variable containing the text. Optionally, supply test key-value pairs. |
||||||||||
|
Raw |
Enter raw data. The raw data can be in any of the following formats.
Select the format from the dropdown menu.
|
||||||||||
|
Multipart/Form-data |
Include attachments.
|
Secure variables can be included in the body. For more information on secure variables, see Secure Variables.
Headers
From the Configuration section, select the Headers tab. Enter details to pass REST API parameters in the HTTP header. These parameters are often used for tracking and security purposes.
Authentication
From the Configuration section, select the Authentication tab. Enter details to authenticate with the REST API.
|
Authentication Type |
Description |
|---|---|
|
None |
Select if the REST API does not require authentication. |
|
Basic Digest |
Where the authentication type is basic or digest, either select an authentication profile or fill in the username and password fields. |
|
OAuth2 Certificate |
Where the authentication type is OAuth2, you must use an authentication profile. |
Use an Authentication Profile
Select a profile from the list provided or select a variable to contain the name of the profile.
|
Ways to use the authentication profile |
Description |
|---|---|
|
Select the Authentication Profile |
The list of authentication profiles is specific to the authentication type selected. When the authentication type is OAuth2, the status of the authentication profile displays. You cannot select an authentication profile with an error status. Open the authentication profile from the manage menu to correct errors. When the profile status shows as OK on the manage menu, reopen the integration node to see the updated status. |
|
Select a Variable |
The name of the authentication profile is stored in a variable. Select a variable to dynamically set the authentication profile during a call. If the variable value fails to match an available authentication profile for the account, the integration node fails to process and the task continues to the next node. If you have a test environment separate from a production environment, you can assign separate variable names to each environment. |
Any Studio user with appropriate permissions to the Studio account can create and edit an authentication profile. See Authentication.
Studio caches the bearer token and re-uses it until the token expires. Studio runs a job to check the token expiry every minute. In each run, the job picks the authentication profiles for which the token might expire in the next three minutes and refreshes the token. If the token expiry is not known, Studio establishes when the newly retrieved token is going to expire using Default Token Expiration set in Authentication Profile Parameters.
The Integration node auto retries once after fetching a new set of authentication credentials if an authentication profile is being used and the API endpoint returns a status code of 401 or 403.
SSL Certificate and SSL Key
Some authentication methods require an SSL certificate and/or SSL key to the resource server. These are usually added to the authentication profile. Use the fields in the integration node to override the values in the authentication profile.
|
Field |
Description |
|---|---|
|
SSL Certificate Certificate Password |
Use to override the SSL certificate added to the authentication profile. To upload the SSL certificate, click Upload. Where applicable, enter the certificate password. |
|
SSL Key SSL Key Password |
Use to override the SSL key added to the authentication profile. To upload the SSL key, click Upload. Where applicable, enter the SSL key password. |
Studio supports mutual TLS authentication where:
-
The public API service identifies itself with a certificate from a public certificate authority.
-
Studio identifies itself with a certificate provided by the customer and provisioned into the customers tenancy. This certificate can be issued by public or private certificate authorities.
Studio does not validate the certificate chain of the customer provided client certificate. The certificate expiry must be customer managed.
Settings
From the Configuration section, select the Settings tab.
The fetch timeout is the maximum time in seconds that Studio waits to retrieve data from the API request. You can customize the Fetch Timeout.
Provide call-waiting music from Music On Hold. Click to upload a WAV file (maximum 3MB).
On fetch timeout, the Response contains the exception message and code on the Data tab, and the exception code on the Meta tab.
|
Tab |
Description |
|---|---|
|
Data |
{"error": <exception message>, "status_code": <exception code>} |
|
Meta |
{"status_code": <exception code>} |
To troubleshoot a suspected fetch timeout, you can manually add JSON paths for error and status_code to evaluate at runtime. On fetch timeout, status_code = 0.
Response
Show the response from the REST API.
|
Action |
Description |
|---|---|
|
Data, Meta, Raw |
Switch between the data and meta parts of the response or show the raw response. |
|
Preview Response |
Verify the integration is configured for success. |
|
|
Provide a sample response according to the selected form (data, meta, raw). The response field is now editable. It shows line numbers and the current position of the cursor. Enter JSON code directly into the response field. If there are errors in your code, basic assistance is provided. |
|
|
Finish providing a sample JSON response. The sample data you entered now looks and behaves like data returned from a REST API. This option is unavailable while there are errors in your code. |


Assign Values to Variables (Data and Meta Response)
Follow these steps to assign responses from the REST API to variables.
-
From the Response field, select a JSON name-value pair.
You may need to switch between Data and Meta to locate the name-value pair to select.
The path to the selected name-value pair displays in the JSON Path field.
The value displays under the path.
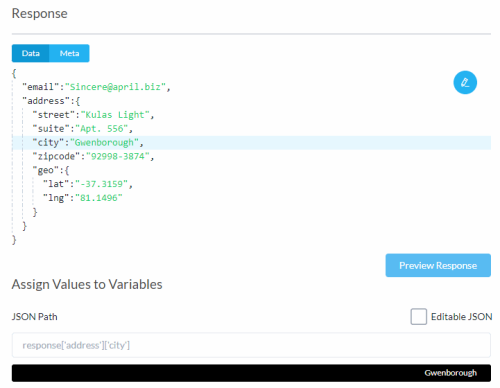
-
To edit the JSON path, select Editable JSON.
Following are some ways to use the editable JSON feature. For more information, see Editing the JSON Path.
Example
Description
response['0']['email'] The path refers to the first email record. response['*']['email'] Replace the number zero with an asterisk to refer to all the email records. response['{{index}}']['email'] Replace the number zero with a variable to iterate over all the email records. -
From the Assign path to variable field, select a variable to assign to the JSON path.
If the variable has not been created yet, type the name of the variable in the field.
-
In the Default Value (optional) field, assign a default value to the variable.
The default value itself can be a variable. Type two curly brackets {{ and select from the available options.
-
Click Assign.
Studio tabulates the JSON path, assigned variable, and default value.


Values Assigned to Variables (Data and Meta Response)
For each JSON path assigned to a variable, Studio tabulates the JSON path, assigned variable, and default value.
|
Field |
Description |
|---|---|
|
JSON Path |
The JSON path from the REST API. |
|
Variable |
The variable assigned to the JSON path. |
|
Default Value
|
The variable default value. This field is editable. The default value itself can be a variable. Type two curly brackets {{ and select from the available options. |
|
Test |
Show the value assigned to the JSON path in the black strip under the JSON Path field.
|
Assign Values to Variables (Raw Response)
Select a variable. The raw response is saved to this variable.