Conversation
![]()
Use the conversation node to send a message, extract details from the response, and direct the flow of the conversation according to the response.
The conversation node is available for digital tasks only, including messaging, chatbot, and WhatsApp.
When using VCC digital channels and the IVA transfer module, the following is recommended:
-
Use the first conversation node in the call flow to send a simple introductory message. Do not add attachments, buttons, and response routes to the first conversation node.
-
From the second conversation node in the call flow, extract details from the response, and direct the conversation's flow.
The chat session is established only after the first conversation node sends its message.
Name
Give the node a name.
Message
Enter the message text.
To include a variable, complete the following.
-
Type two curly brackets {{
The variables in your account are displayed in a menu. To filter the list, start typing the name of the variable.
-
Select the variable.
Advanced
Add rich media to the message. Use the advanced tab when you want more control than is possible from the rich media tab.
The advanced tab is available to ChatBot tasks only.
|
Field |
Description |
|---|---|
|
Message JSON |
Enter the JSON message to send or a variable that contains the JSON message. For more information on variables, see Variables. |
|
Incoming JSON Format |
Provide a sample JSON message to show the format of the message you may expect to receive. Add a variable node after the conversation node to capture the conversation response using the Expression Builder getElementFromJson method. See the Variable node and the Expression Builder. |
For more information on the JSON structure, see Rich Media Advanced.
Rich Media Message Attachments
Attach a file or URL to the message.
Message attachments are available to ChatBot and WhatsApp tasks only. Incoming and outgoing attachments for chatbot sessions delivered using Five9 Web Messenger require the Studio account be linked to a Five9 domain with Use File Service enabled. See Studio Accounts.
|
Column |
Description |
|---|---|
|
|
Re-order the attachments using a drag-and-drop motion. |
|
Attachment Type |
Select from: image, video, audio, document, sticker. |
|
File/URL |
Enter the public URL of the file to attach. If the public URL is stored in a variable, type {{ and select from the available options. |
|
|
Attach a file from Studio content items. For more about Studio content items, see Content. For more about how to add a file to Studio content items, see Files. |
|
|
Delete the attachment. Hover over the row to see the icon. |
Rich Media Message Buttons
Send a link or buttons to click in the message.
Rich media message buttons are available to ChatBot tasks only.
|
Column |
Description |
||||||||||
|---|---|---|---|---|---|---|---|---|---|---|---|
|
|
Re-order the buttons using a drag and drop motion. The buttons appear to the recipient in this order. |
||||||||||
|
Type |
Select from: link, reply, postback, or location.
|
||||||||||
|
Label |
Supply text for the button label. The recipient sees this text on the button. |
||||||||||
|
Icon |
To add an icon to the button label, supply the public URL to the icon. |
||||||||||
|
URL |
When the recipient clicks the link, the URL opens in a new page in their web browser. |
||||||||||
|
Goto Node |
When the recipient clicks the reply or postback button, the call flow routes to this node. |
||||||||||
|
|
Delete the button. Hover over the row to see the icon. |
If you would like more detail on the JSON structure of message buttons, see Rich Media Message Buttons.
Response
Route the conversation according to the recipient's text response.
-
Extract words from the message.
-
Match those words to keywords.
-
Route the message call flow accordingly.
|
Section |
Description |
||||||||||||||||||||||||||||
|---|---|---|---|---|---|---|---|---|---|---|---|---|---|---|---|---|---|---|---|---|---|---|---|---|---|---|---|---|---|
|
Extract Words |
Create at least one word rule to extract words from the received message and select the variable to store the word rule.
|
||||||||||||||||||||||||||||
|
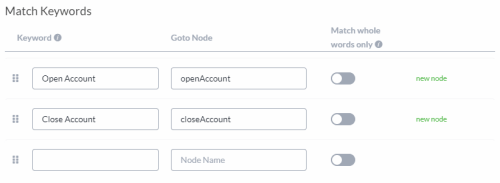
Match Keywords |
Route the call flow according to the keywords matched from the extracted words.
For this example, when keyword Open Account is matched, the call is routed to the node openAccount, and when keyword Close Account is matched, the call is routed to the node closeAccount. |
||||||||||||||||||||||||||||
|
Otherwise Goto Node |
Route the call flow to this node when none of the keywords are matched. Select from the available nodes in the call flow or type the name of a new node. This field is required to ensure best practices are followed. It ensures the call flow always has a backup node, even though in some cases that may seem redundant. |
Delivery Notification
Receive delivery notifications.
To use this feature, you must host a web service capable of receiving notification events.
|
Field |
Description |
|---|---|
|
Webhook URL |
Enter the URL for your web service. |
|
Query Parameters |
Pass additional parameters to your web service. These parameters are included with the notification events. They are often used to differentiate one SMS (message) from another. |


