Visual Form
![]()
Use the visual form node to supply the caller with a web page during a voice call. The web page may include a form for the caller to fill in.
Here are some example scenarios:
-
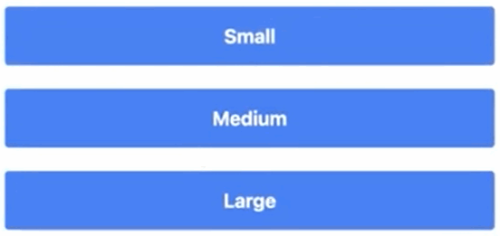
The caller wants to order a cup of coffee. As part of filling in their order, the caller opens a web page illustrating the various coffee cup sizes. From the web page, the caller selects small, medium, or large.
-
The caller wants to enter personal information privately. The caller opens a web page and types personal details like name and email address, and submits the information.
-
The caller wants to read a document and respond. The caller opens a web page and reads the document. The caller responds in a form on the web page.
-
The caller receives a request to upload an image or document.
The Caller Experience
-
The caller hears instructions, such as the following:
You will soon receive an SMS message from us. The SMS message contains a hyperlink. Open the SMS message and click the hyperlink.
To enter these instructions, use Prompt.
-
The caller opens the web page.
Documents and images at the top of the page typically support the caller to fill in the fields or select the right button. To add documents and images to the web page, use Attachments.
The web page continues with one of the following:
-
Input fields and Submit
The caller fills in the fields and clicks Submit. To add these fields to the web page, use Form Fields.
For example, these are text input fields and a Submit button.
This is a file upload input field and a Submit button.

-
Buttons
The caller selects from a number of options by clicking a button. To add buttons to the web page, use Buttons.
-
-
The web page acknowledges when the caller completes the form.
-
Return to step 2 if another visual form node exists in the call flow. The next web page loads.


The call flow can be set so that the caller hears a voice message at key events, like when the web page is opened.
The Call Flow
For a sequence of questions, you can use a sequence of visual form nodes. For example, to order a cup of coffee, you can use a sequence of visual form nodes to ask coffee type, cup size, type of milk, extras, and contact information.
Following a visual form node, you can add the following.
-
Use a Prompt node to speak to the caller when they complete the form. If the caller selected an option on the form like small, medium, or large, then you can repeat the caller's selection.
-
Use a Goto node to give the caller another opportunity if they fail to open the hyperlink.
-
Use a Datastore node to save returned values to a datastore.
-
Use a Decision node to direct the flow according to whether the returned value is valid.
Prerequisites
To use the visual form node, you must first create an SMS profile using the Manage section of Studio.
Name
Give the node a name.
SMS Profile
Select the SMS profile that you created in the Manage section of Studio.
SMS Receiver
Enter the phone number to receive the SMS message. To enter a variable containing the number, type {{ and select from the available options.
SMS Content
The caller receives an SMS message with a hyperlink to the web page.
Text typed in this field is added to the SMS message. The text follows the hyperlink. To include a variable in the message, type {{ and select from the available options.
If the SMS content text field is empty, the caller receives an SMS message containing the hyperlink only.
Goto Node
The call routes to this node when the caller opens the hyperlink.
Otherwise Goto Node
The call routes to this node when the caller fails to open the hyperlink. Select from the available nodes in the call flow or type the name of a new node.
Prompt
Specify the prompt to play to the caller.
You will soon receive an SMS message from us. The SMS message contains a hyperlink. Open the SMS message and click the hyperlink.
The Add Pause, Volume, Pitch, Emphasis, Say As, and Rate menus above the TTS prompt apply SSML parameters. See Text-to-Speech Prompts.
Prompt Timeout (seconds)
Shortens or lengthens the time in seconds that the system waits for the caller to open the hyperlink before directing the call to the otherwise goto node.
The minimum time is 10 seconds. The maximum time is 60 seconds.
Attachments
Attach files (images and documents) to provide visual information to the caller. The caller sees the attached files at the top of the web page.
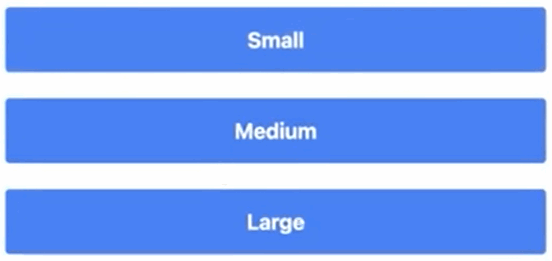
The form invites the caller to select small, medium, or large. An attached image shows pictures of small, medium, and large items with dimensions.
Add the files (images and documents) from the Form Fields tab under Attachments. When a file is added, Studio automatically allows you to add another file . The web page displays the files in the order they were added to Studio.
|
Action/Property |
Description |
|---|---|
|
|
Remove the attachment. |
|
|
When a Studio content item is attached, remove the content item. |
|
Attachment Type |
Attachment types are image and document (PDF). To attach a URL, select document and embed the URL in the document. |
|
File/URL |
Use to attach a file accessible from a public URL. Enter the public URL for the file. If the public URL is stored in a variable, type {{ and select from the available options. |
|
|
Use to attach a file that is a Studio content item.
To upload a file, click Add File. |


Form Fields
Using form fields, the caller can type information into an input field, upload an image, or upload a document.
|
Action/Property |
Description |
||||||||
|---|---|---|---|---|---|---|---|---|---|
|
|
Click to delete the form field. |
||||||||
|
Title |
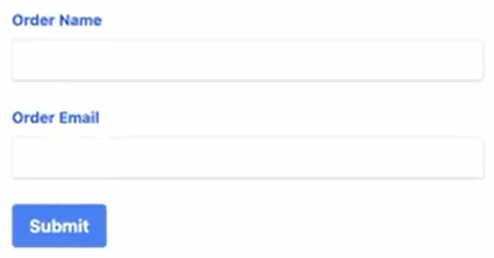
Text to display on the web page above the input field that identifies the field. Examples are Order Name and Order Email. |
||||||||
|
Save to Variable |
For text field type, the variable contains the text entered by the caller. For image or document field type, the variable contains a public link to the uploaded image or document. |
||||||||
|
Default Value |
The variable takes on this value when the caller does not fill in the field. This is available to all form field types. |
||||||||
|
Placeholder |
When the field type is text, the placeholder shows in the form field before the caller enters a value. Use it to show a sample value or the expected value format. |
||||||||
|
Field Type |
Select the field type.
|
||||||||
|
Save image or document type to variable |
When the field type is image or document upload, this variable contains the type of image or document uploaded. |
||||||||
|
Description |
Text to display on the web page under the title and above the input field that describes the field. |
Buttons
Use buttons to offer the caller options. To make their choice, the caller clicks a button.
This is what buttons look like in the caller's web browser.
Use the Form Fields tab in Studio to create buttons. When you add a label to a button, Studio automatically displays the actions and properties for another button.
|
Action/Property |
Description |
|---|---|
|
Button Label |
Text or the variable containing the text to display on the button. Use the text to identify the button option. |
|
Value |
Value to store or the variable that contains the value to store when the caller clicks the button. |
|
Assign to Variable |
Name of the variable to store the caller's response. |
|
|
Delete the button. |